How to insert an elastic waistband (one method): TUTORIAL WITH PICTURES


Huzzah! My first sewing tutorial! I’ve had this waiting in the wings now for a while but never got around to writing and formatting it until now due to real life craziness and settling into my new job. Now that that is done, I can get back to blogging! 🙂 YAY!

This tutorial was inspired by a request for advice for a common technique known as inserting an elastic waistband into a skirt about a month ago from the Meesha Booh Sew Easy Facebook group (which has since been posthumously renamed to Meesha Taught Me). As it turns out, I was making a simple knit skirt with a waistband at the time, so here it is, in all it’s glory! Enjoy, and I hope it helps some of you along in your sewing projects!

Supplies you will need:

– Sewing project in need of a waistband (can be a skirt, bottom of a bubble top, pants, PJs, leggings, just about anything, really!)

– Cloth tape measure

– Elastic of preferred width (what width you choose usually depends highly on your project, but I don’t recommend choosing any wider than 1.5 inches for an inset waistband).

– Sewing machine

– Thread

– Pins


Step 1: Lay out your project (like I have done here with my knit maxi skirt). Image

This will give you some eyeball room as you do this.


Step 2: Measure and Cut Elastic

Image

To do this, measure around wherever the waistband is going to sit on your body, then take that measurement and minus 1.5 to 2 inches. That will give you the length of your elastic. The reason why we minus that short amount is to make sure that the waistband stretches slightly when you wear the garment to give a good fit to it. Take that measurement number and measure and cut your elastic.


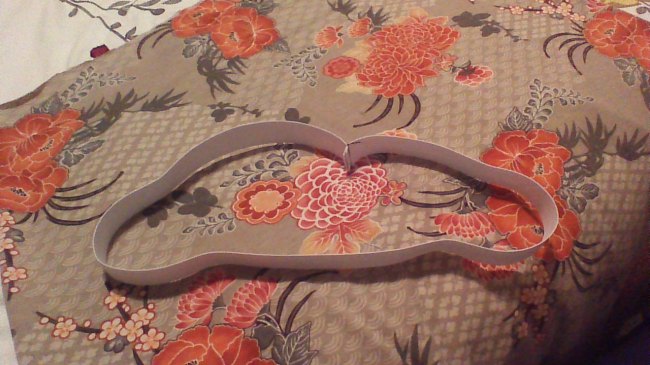
Step 3: Sew elastic into a loop

Image


This is pretty self explanatory, just fold the plastic in half and sew up the ends. Make sure to go back and forth over it a few times.

Image Now, one thing I do in addition to that to reduce bulk is that I fold the two seam allowances down and stitch both down flat, but that is optional because you can just trim it down a bit if you want.


Step 4: Turn the skirt (or project) inside out).

Image


Step 5: Pin waistband to skirt

Image

Ok, so you’ll start this off by matching the sewn section of your loop to one of the side seams of your project (it doesn’t matter which one). Pin there. Next, find the opposite half of the elastic from that point and pin it to the other side seam. From there, find the middle front of the project and the halfway point between the two elastic pinned parts and pin that down. Do the same thing on the other side.

Image

As you can see in this picture, there will be more fabric than elastic between the pinned portions. Don’t panic, this is a good thing, and in a minute I’ll tell you why.

Step 6: To the sewing machine!

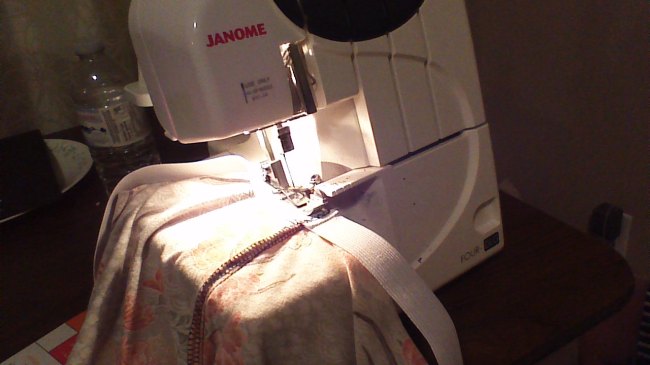
I’m using a serger for this but you can just use a zigzag stitch on your sewing machine to the same effect. Please note though that if you re sewing a project with stretchy knit with a zigzag stitch on a sewing machine, I highly recommend switching to a ball-point needle because otherwise you are just going to end up skipping stitches and pulling out your hair in frustration. Trust me on this one.

 Image

Start off a couple of stitches to get a good pattern going, like above.

Image

Now here is where the magic happens. You are going to take your elastic and you are going to stretch it out until the elastic is flush with the fabric, as seen above. Keep it stretched out as you sew. The waistband will start to gather as you sew it. Do this all the way around.

Image This is what it should look like.


Step 7: Finishing the band

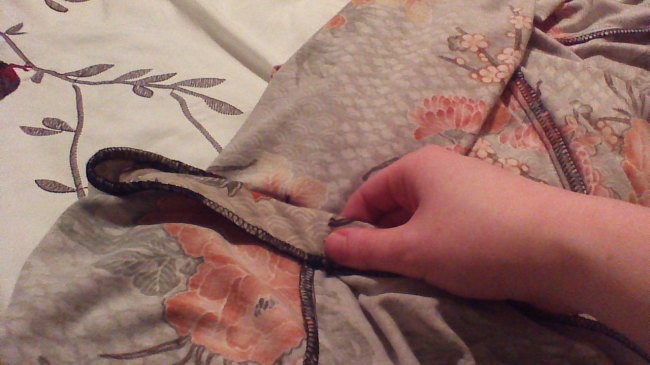
You are now going to use the straight stitch on your sewing machine for this bit. Take your band and flip it over once so that the fabric is covering it, like so:

Image

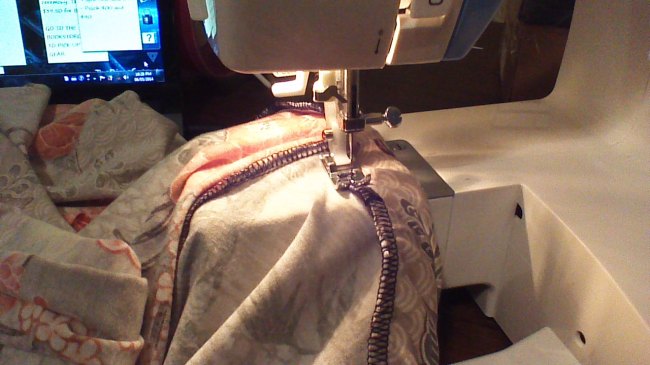
Pin this down. Now take your project and sew your elastic with a straight stitch on the bottom of the fold, making 100% sure to stretch as you sew.

Image


TA DA! You are done! You may now consider yourself to be super awesome!

Image The final rresult!


So yeah, I hope you guys learned a thing or two from this tutorial and that I was able to help someone along the way! God bless! 🙂

Posted in Sewing, Tutorials | Tagged , , , , , | Leave a comment

For Meesha

10299975_778879358809405_249807887291910489_n

The sewing community just lost a much loved and valued member two days ago. Tamisha Ridge of YouTube channel DIYMeesha fame and creator of the Facebook sewing group ‘Meesha Booh Sew Easy’ (of which I am a member) was killed in an act of domestic violence early Wednesday morning. It was a tremendous shock to everyone who knew her and were connected to her through the group, YouTube channel and multiple other means. With her dazzling smile, her beautiful personality that shone through her like a lantern, her love of Jesus and her generosity with sharing her gifts with others, she served as an inspiration to thousands and leaves a rich legacy here on Earth while now in Heaven.

I didn’t have any purple fabric to make a tribute piece for her for Domestic Violence Awareness (I used what I did have to make my wrap top which I wrote about in my second post) so I decided to write something instead, which I wrote today during slow periods at work. I only hope it does her some sort of justice.

*******************************

Seamstress

Spools of thread dangle
from your fingertips
and with a smile, you
thread your needles
and, with hands and with machine
you start bringing the pieces together –
Buttons, zippers, lines of elastic,
All kinds of fabric, from chiffon to
cotton to canvas,
shiny and matte,
all unique, all beautiful.
Then the threads would change
from cotton and silk to
strands of your own hair,
and you begin to stitch together
children, family,
friends, a web of threads
stretched around the world,
and we were made the better for it.

The life of the seamstress
is tied to the needle,
to the rise and fall.
Sometimes fabrics snag,
threads tangle,
machines burn out,
needles dull over time.
Things get hard
and we want to give up,
but you just sit down and take out
the seam ripper and scissors
and build up patience as you work.

You were so beautiful,
outshining any piece that you created,
both outside
and inside,
showing through your eyes
like stars that could not be broken.

The needle rises and falls,
rises and falls,
rises and
falls,
rises and

snap.

The needle wasn’t supposed to
break yet.
We do not understand
why these things happen,
why you were taken from us.
I hope that someday
we will,
whether with our feet on
solid dust and cold cement
or entering through the gates
of gold,
but until that day,
your eyes shine on in memory
and your legacy of threads
and love remains.

We love you, Meesha.

Posted in Creative Writing, Sewing | Tagged , | 2 Comments

SEWINGPALOOZA


If you’ve been wondering where I’ve been, I’ve recently had to pack up everything and move back to my hometown for the summer, and with that and getting ready for my summer job it’s been hectic. That being said, I FINALLY HAD TIME TO SEW, and boy, did I ever use it! Between Saturday and today I have made six different items for summer, five which were a success and one of which was a total failure. Later today I will also be doing more sewing, as tomorrow I have orientation for work and after that I have no idea what time I’m going to be having for sewing or anything else.


Project 1: Bandeau bra

For obvious reasons I will not be modeling this, haha. If you have ever seen a black bandeau, however, this is no different. Finished this project in about three hours and it fits decently, but the padding I bought for it was too big o I won’t be wearing this until I can find the proper padding for it.


Project 2: Romper

I have pictures of this so I’ll post them later with my face shopped out of it.

I made this using Sectetlifeofabionerd’s “how to turn a t-shirt into a romper” tutorial and a pair of loose sleeping shorts and a tank nightie as a base pattern so I could get that Doric chiton drape in the waist and nice flow in the shorts. I must say, it turned out rather well and is very light and comfortable. It is a tank-top up top so I’ll be taking pictures of what yours truly did with the back later.

Time it took to make: One day (literally, this wasn’t very difficult).
Skills learned: How to set up an elastic channel properly.

Project 3: Knit Sheath Dress

Image


Here it is, in all it’s comfy, soft glory! This dress was probably one of the easiest projects I have done in a long time. Finished it in about 4-5 hours over a two day span, including pattern drafting and cutting. It is a very comfortable dress, perfect for summer. My only question now is whether I should add a pocket to the front like a hoodie or whether I should just leave the dress as is. Readers: Your thoughts?


Project 4: Biking Shorts

This also technically falls under the lingerie category so no pictures here. These shorts are made to be worn underneath work coveralls during the summer so that I don’t die with heat, whilst at the same time if I suddenly have to take off my coveralls in an emergency (if I get chemicals spilled on me, for example, or if they catch on fire) I will still be somewhat modestly dressed.


 Project 5: Leather-like leggings

Ok, now onto possibly the most fun thing that I have sewn in a while. A while ago I bought some leather-like knit on sale at Fabricland and decided to make a pair of leggings out of it for fun. The results looked AWESOME, especially when they are paired with my leather jacket and knee-high studded leather boots. It looks like all I need is the Harley, haha. I’ll possibly have pics of the leggings up later as well, though not of me modeling them.


However, not everything I make is a total success, so let us now move on to Project # 6, or my first fail project: Tam Hat (or as it is known as, the Big Fat Ugly Newfie Shower Cap.

Image

Image


It looks innocent enough, just a tam made out of Newfoundland tartan to reflect my Newfie heritage, right? Sadly, however, this is not the case. To be blunt, I look like a tartan pizza fell onto my head from the ceiling when I wear it, or worse, like I should be saying ‘I’m sorry Mario, but your princess is in another castle!’ It just goes to how that you can’t win them all, I suppose…

So that wraps up the first few days of sewingpalooza! Hopefully I’ll have a few new things to show you guys soon!


Posted in Uncategorized | Leave a comment

Jackie Hill’s “Jig-a-Boo”

My mother shared this video with me over a year ago, when I was struggling with false doctrine after God brought me out of not one but two very toxic churches, and to this day I can almost recall every single word as it burned into the neurons pulsing just underneath my skull. Jackie Hill is a former lesbian who Jesus saved, and her spoken-word critique of both the Prosperity Gospel and the general lack of discernment throughout the evangelical church and throughout all of Christendom is both powerful and very important. As someone who was once one of the ‘Little Red Riding Hoods’ that she speaks of, I can testify that her critiques are both true to form, Biblical and valid, and if you recognize yourself in this poem please don’t ignore this.

Posted in Christian Theology/Doctrine | Tagged , , , , | 2 Comments

Misadventures with a Wrap Top (AKA my latest sewing project)

Quick background: I taught myself how to sew via YouTube video tutorials and have been sewing for a year and a half now. Please note that I am not a professional, so take whatever I say with a grain of salt, ok?

HOO BOY. Just finished this particular sewing project at 1 AM on Friday night so that I could wear this wrap top top to my workplace on Saturday. Once I have my dress form back in my possession I’ll post a picture of it being modeled on there (as I make it a point not to post pictures of myself online unless it’s Facebook). I would have had this finished earlier, except I hit setback after setback so it took me a total of FOUR DAYS to put this top together when it could have easily just taken me one. >_> OY.

Anyways, this was the pattern that I used: Image

Vogue 8833, view D (sleeveless) to be more specific. I modified it slightly, however, by using two different patterns of Cassandra Quilting cotton (which you can grab at Fabricland if you are up in Canada like yours truly): One is a deep purple print that I used for the main portion of the top, and the other was a lavender print that I used for the front binding and the tie belts. I also used quilting cotton, and it turned out pretty decently, but next time I’d probably at least use proper shirtweight cotton to make this top.

To discuss how many times I messed up while doing this project, I will be breaking up this story into four one-day segments to get a good view at how frustrating that this project was for me, starting now:

DAY ONE: Having previously bought and washed my fabric (Tip: ALWAYS PREWASH YOUR COTTONS. This will prevent shrinking and seam warping later on), I cut out all the pieces and interfacing, only to find I didn’t have enough fabric for the collar or bindings. I also ran out of interfacing. Frustrated, I finish up for the day and vow to grab more the next day.

DAY TWO: More fabric in hand, I cut out and face remaining pieces together, but real life interfered and that was all I got done that day.

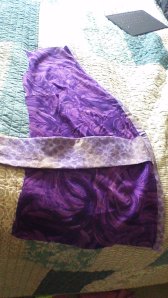
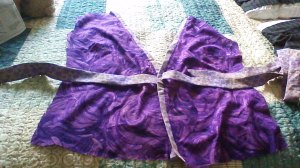
DAY THREE: I stitch the breast darts on both of the front pieces and finish the tie belt by putting the two halves of the belt pieces right sides together, stitching it up on the sides and at one end, then turning it right side out and pressing it flat before finishing the other end (yes, just belt. You’ll see why in a minute). I then attach it and the front facing binding to the front right piece. This is the result: WIN_20140425_145443

If you have worked with this particular pattern before, you are probably already laughing.

DAY FOUR: I prepare the binding for the other panel only to notice that there are two belts in the pattern instructions. Confused, I go back to check my pattern belt piece, and it indeed says to cut just two pieces. It is then, however, that I noticed the fold line. My big fat belt was actually supposed to be two skinny belts!

After headdesking a few times, out came the seam ripper. Fortunately this repair wasn’t too difficult to make, I just had to take the belt off and reassemble it, then reattach the two belts (one to each side) using a slipstitch by hand. It looks a little rough but not too noticeable.

I go to attach the binding on the left front panel only to notice that I’d accidentally had cut two right binding pieces so it didn’t match up. Insert more headdesking, cutting out new pieces and interfacing here. Fortunately this one fit properly, and the two halves were quickly done:
WIN_20140425_190238 It’s finally starting to shape up!

I quickly attach the side fronts, leaving a seam hole in one of them (which I had to adjust one inch lower because my waist is fairly long), which I then reinforce. I then zip up the side backs to the center back. This is the step that gives me the least amount of trouble during this whole process.

WIN_20140425_201557

By now it is getting pretty late so I attach the front and back together at the shoulder and side seams, then go to finish the collar. It is then that I realize that I was only supposed to interface one collar piece, not both of them. Insert dropping my head into the crater made in my desk from earlier headdeskings here, along with cutting out a new piece. Fortunately that is the last of the major errors, and the collar is quickly formed and attached to the neck, though the slipstitching portion takes forever. By now it is getting close to midnight and my sister (who is also my roommate) is asleep in the next room over, so I move my machine to my bathroom to finish the armhole facings and the hem. I finish both of these at one in the morning, and my top is done!

WIN_20140426_000133

I then fall into bed, where I then have six hours to sleep before I have to get up to go to work. OY.

Anyone else try the pattern out/have any questions about how I did it? Leave me a comment below!

Posted in Sewing | Leave a comment

Christianity, writing, sewing, video editing, cosplay, fanfiction, books, music, DIY and a thousand other things besides…

That is basically what this blog will be in a nutshell; it’s Exactly What It Says On The Tin.

My name is Leah, but you can call me Ozy. I am from the land of Ice, Snow and Tim Hortons, AKA Canada. I have been a Christian for most of my life (I was saved when I was seven years old and rededicated my life when I was 12), so I will be writing about my Lord and Savior Jesus Christ and His Word a lot, particularly about doctrinal issues that have come up a lot recently in Evangelical Christianity. I have also been a writer ever since my mother gave me a notebook in Grade 6 and told me that for English I was to write one page a day of whatever I wished and that she would grade it (also known as the third best thing my mother ever did for me, the first two being giving birth to me and introducing me to Jesus, natch. :p Thanks Mom!). I write just about anything, from poetry to short stories to novels (though I’ve yet to finish writing one >_>) to essays (especially lately, the last four years of college have been nothing but essays it seems), so occasionally those might pop up here too (unless I publish them; if that happens, I will post purchase links/links where the writing was published online).

Sewing is a really big thing for me right now and has been for the last year and a half, so I will be posting a LOT about my various projects both for myself and for sale (including PICTURES), as well as tutorials I might come across online for the benefit of other sewers who might come across this blog (sewing nuts rejoice!). I also used to cosplay so I’ll be posting about that too, including posting old pics of cosplays as well as other stuff I find to be really well-done/fascinating. Everything else mentioned in the title I’ll probably be hitting on occasionally.

One final note; updates may be sporadic due to Real Life happening as well as occasionally needing a writing break (I have handwritten poem-journals that I keep in addition to this blog, so I try to write at least 3-4 times a week). If I disappear for a while DO NOT PANIC; I’m not dead, just super busy/tired. :p

And with that note, I hope all of you enjoy my blog and I hope to get to know you guys better in the future! 🙂

P.S. YES the cover picture of my blog is from Mushi-Shi. 😀

Posted in Christian Theology/Doctrine, Cosplay, Creative Writing, Dating and Christian Marriage, Fanfiction, Sewing, Uncategorized | Tagged , , , , , , | Leave a comment